Database
About
We use CouchDB because it's a simple document-oriented NoSQL database. The database has two main purposes:
- Saving test report;
- Data synchronization with the web interface.
The CouchDB version must be equal to or greater than the 3.2 version.
Database in pytest-hardpy
Description of databases
The pytest plugin has 2 databases: statestore and runstore.
- The statestore database uses for frontend data synchronization.
- The runstore database contains the document, which is a JSON object that stores the current state of the test run.
A separate database is required to store the list of reports.
The report database is used as an example of storing reports on past testing runs.
It can be launched in the same instance as the statestore, runstore database, or in a different one.
The database is accessed through the CouchdbLoader class, which can be called at the end of each launch.
To read the current report, use the get_current_report() function.
Sample code for saving a report at the end of testing:
# conftest.py
def save_report_to_couchdb():
    report = get_current_report()
    if report:
        loader = CouchdbLoader(CouchdbConfig())
        loader.load(report)


@pytest.fixture(scope="session", autouse=True)
def fill_actions_after_test(post_run_functions: list):
    post_run_functions.append(save_report_to_couchdb)
    yield
HardPy users have the flexibility to choose their preferred database. They can write custom classes to record reports at the end of testing.
Runstore scheme
The runstore and report databases have the same schema, as runstore stores the current report and report stores reports.
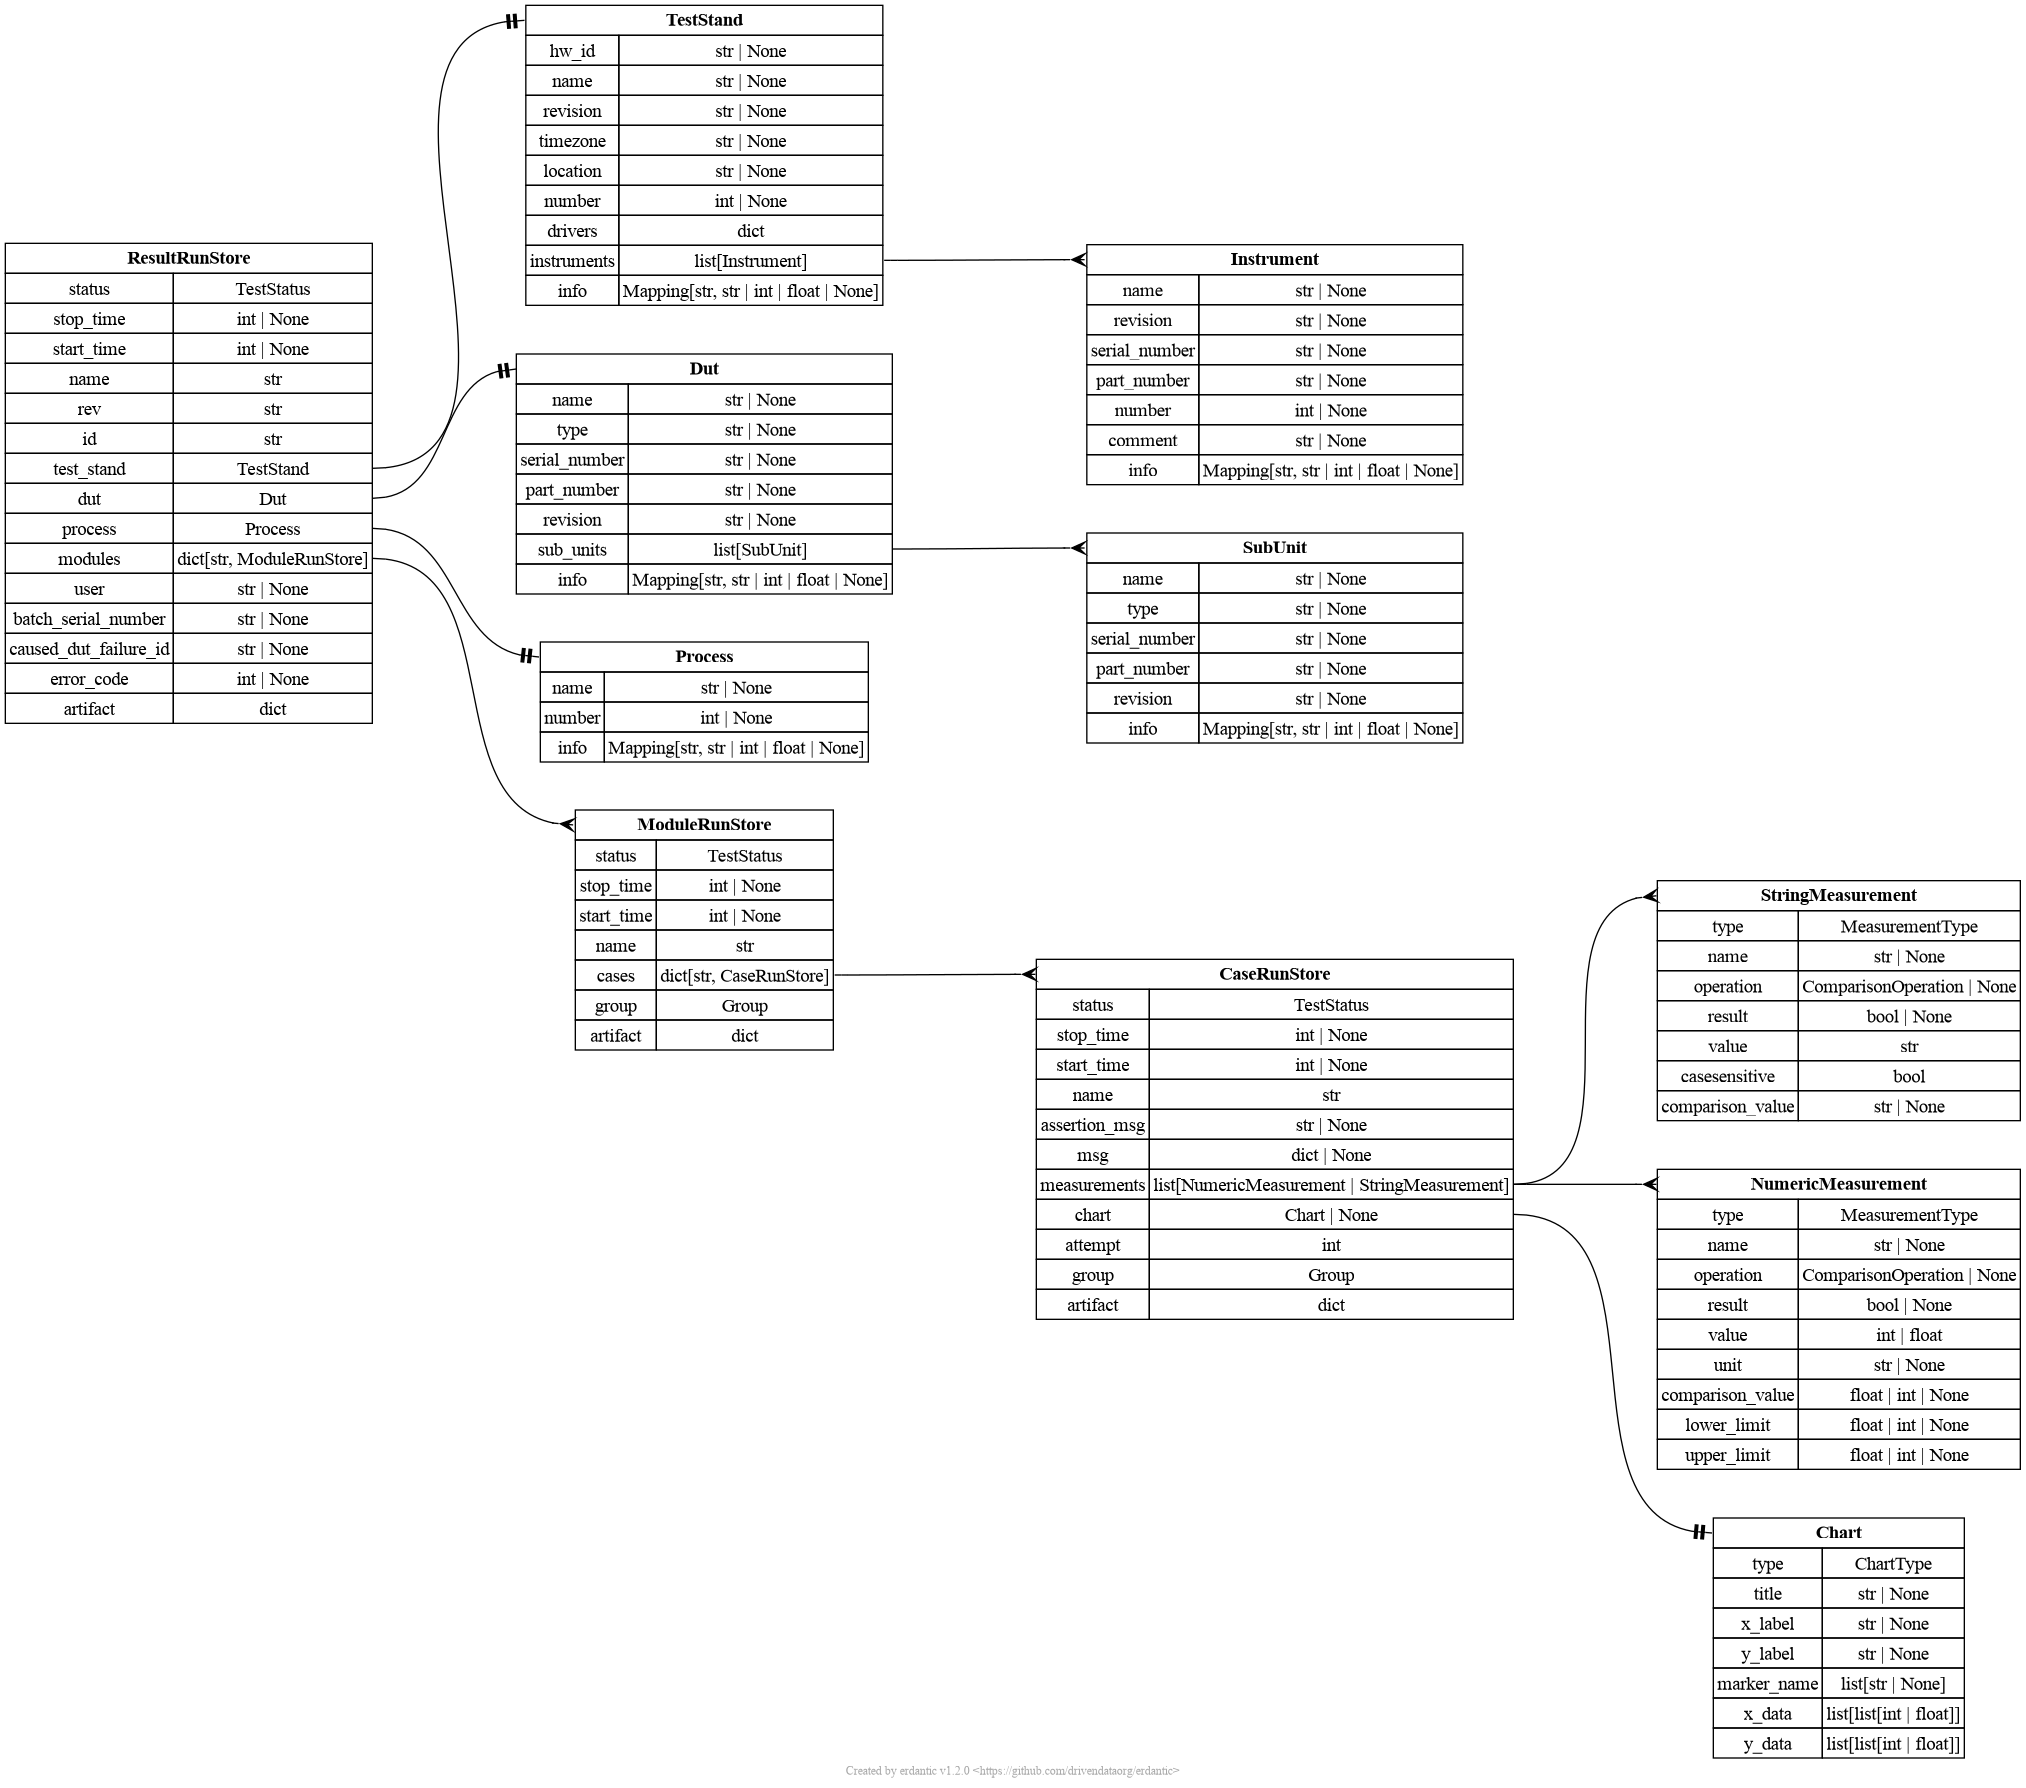
The document of runstore database contains some section.
main
- _rev: a CouchDB revision MVCC token; The variable is assigned automatically.
- _id: unique document identifier. The variable is assigned automatically.
- stop_time: the end time of the test in Unix seconds. The variable is assigned automatically.
- start_time: the start time of the test in Unix seconds. The variable is assigned automatically.
- status: test execution status from pytest: passed, failed, skipped, stopped. The variable is assigned automatically.
- name: the name of the test suite. It is displayed in the header of the operator panel.
The user can specify the name using the
tests_namevariable in the hardpy.toml file. If this variable is not set, the name will be taken from the directory name containing the tests. - test_stand: test stand information. See the test_stand section for more information.
- dut: DUT information. See the dut section for more information.
- process information about the testing process. See the process section for more information.
- modules: module (pytest files) information. See the modules section for more information.
- user: HardPy operator panel user name. The variable is assigned by set_user_name function. It can only be set once per test run.
- batch_serial_number: the serial number of the device batch. The variable is assigned by set_batch_serial_number function. It can only be set once per test run.
- caused_dut_failure_id: the ID of the first failed test that caused the test failure.
Format id:
module_name::case_name. The variable is assigned automatically. - error_code the error code (non-negative integer) of the caused DUT failure test. The variable is assigned by ErrorCode class.
- artifact: an object that contains information about the artifacts created during the test run. The user can specify the run artifact by using set_run_artifact function. The artifact contains a dictionary where the user can store any data at the test run level. The artifacts are not displayed on the operator panel.
test_stand
The test_stand section contains information about the test stand. It is a computer on which HardPy is running and to which the DUT test equipment is connected.
- name: test stand name. It can only be set once per test run. The user can specify the stand name by using set_stand_name function.
- revision test stand revision. It can only be set once per test run. The user can specify the stand revision by using set_stand_revision function.
- drivers: DEPRECATED, DO NOT USE IT. Information about drivers in the form of a dictionary, including test equipment and test equipment software.
- instruments: list of information about the instruments (i.e. equipment) that form part of the test bench. See the instrument section for more information.
- info: dictionary containing additional information about the test stand. The user can specify the additional info by using set_stand_info function.
- timezone: timezone of test stand as a string. The variable is assigned automatically.
- location: the location of the test stand, e.g., the country, city, or laboratory number. It can only be set once per test run. The user can specify the location by using set_stand_location function.
- number: test stand number. Some stands may have the same name and run on the same computer but have different numbers. It can only be set once per test run. The user can specify the stand number by using set_stand_number function.
- hw_id: test stand machine id (GUID) or host name. The variable is assigned automatically by the py-machineid package.
instrument
Information about the instrument (i.e equipment) that form part of the test bench. Information about equipment such as power supplies and voltmeters, which may be used in the test stand, should be stored. The user can specify the instrument information by using set_instrument function.
- name: instrument name.
- revision instrument revision.
- serial_number instrument serial number.
- part_number instrument part number.
- number: instrument number.
- comment: comment on the instrument.
- info: dictionary containing additional information about the instrument.
Power supply information:
// power supply info
{
  "name": "Everypin Power Supply",
  "revision": "1.1.0",
  "serial_number": "4235098",
  "part_number": "E012",
  "number": 1,
  "comment": "",
  "info": {
    "sw_version": "1.1.3"
  },
}
test_stand examples
Two stands on one computer:
// test stand 1
"test_stand": {
  "hw_id": "840982098ca2459a7b22cc608eff65d4",
  "name": "Test stand A",
  "revision": "1.0.0",
  "timezone": "Europe/Helsinki",
  "drivers": {},
  "location": "Helsinki",
  "number": 1,
  "instruments": [
    {
      "name": "Everypin Power Supply",
      "revision": "1.1.0",
      "serial_number": "1238",
      "part_number": "EPS_08",
      "number": 1,
      "comment": "",
      "info": {
        "sw_version": "1.1.3"
      }
    }
  ],
  "info": {}
},
// test stand 2
"test_stand": {
  "hw_id": "840982098ca2459a7b22cc608eff65d4",
  "name": "Test stand A",
  "revision": "1.0.1",
  "timezone": "Europe/Helsinki",
  "drivers": {},
  "location": "Helsinki",
  "number": 2,
  "instruments": [
    {
      "name": "Everypin Power Supply",
      "revision": "1.1.0",
      "serial_number": "1237",
      "part_number": "EPS_08",
      "number": 1,
      "comment": "",
      "info": {
        "sw_version": "1.1.3"
      }
    }
  ],
  "info": {},

},
Two different stands:
// test stand 1
"test_stand": {
  "hw_id": "840982098ca2459a7b22cc608eff65d4",
  "name": "ABC",
  "revision": "1.0.0",
  "timezone": "Europe/Helsinki",
  "drivers": {},
  "location": "Laboratory 1",
  "number": null,
  "instruments": [],
  "info": {},
},
// test stand 2
"test_stand": {
  "hw_id": "156731093ab759a7b11ac108eaf69d2",
  "name": "DEF",
  "revision": "2.1",
  "timezone": "Europe/Helsinki",
  "drivers": {},
  "location": "Laboratory 2",
  "number": null,
  "instruments": [],
  "info": {}
},
process
Information about the testing process. For example, the device undergoes several stages of testing during the manufacturing process, including acceptance testing, firmware testing and functional testing of the board both with and without the case. Each stage may have its own name, number and other attributes.
- name: process name. It can only be set once per test run. The user can specify the process name by using set_process_name function.
- number: process number. It can only be set once per test run. The user can specify the process number by using set_process_number function.
- info: dictionary containing additional information about the process. The user can specify the additional info by using set_process_info function.
dut
The device under test section contains information about the DUT.
- name: human-readable name of the DUT. The user can specify the DUT name by using set_dut_name function. It can only be set once per test run.
- type: type of DUT, f.e "PCBA", "Casing", etc. The user can specify the DUT type by using set_dut_type function. It can only be set once per test run.
- serial_number: DUT serial number. This identifier is unique to the testing device or board. It can only be set once per test run. The user can specify the DUT serial number by using set_dut_serial_number function.
- part_number: DUT part number. This identifier of a particular part design, board or device. It can only be set once per test run. The user can specify the DUT part number by using set_dut_part_number function.
- revision: DUT revision. The user can specify the DUT revision by using set_dut_revision function. It can only be set once per test run.
- sub_units: list of sub units of main DUT. Each sub-unit has a similar structure to the DUT itself, but does not contain any other sub units. The user can add the sub unit by using set_dut_sub_unit function.
- info: dictionary containing additional information about the the DUT, such as batch, board revision, etc. The user can specify the additional info by using set_dut_info function.
dut examples
Testing of two devices of the same type (same part number):
// dut 1
"dut": {
  "name": "mainboard",
  "type": "PCBA",
  "serial_number": "1000-10",
  "part_number": "ABC11",
  "revision": "rev_1",
  "sub_units": [],
  "info": {
    "sw_version": "2.2"
  }
}
// dut 2
"dut": {
  "name": "mainboard",
  "type": "PCBA",
  "serial_number": "1000-11",
  "part_number": "ABC11",
  "revision": "rev_1",
  "sub_units": [],
  "info": {
    "sw_version": "2.2"
  }
}
modules
The modules section contains the information about tests. Each module contains information from a single test file. The module's name is the same as the file's name.
- test_{module_name}: an object containing information about a specific module.
The
{module_name}variable is assigned automatically. Contains the following fields: - status: module test execution status. The variable is assigned automatically.
- name: module name, by default the same as module_id. The user can specify the module name by using module_name marker.
- start_time: start time of module testing in Unix seconds. The variable is assigned automatically.
- stop_time: end time of module testing in Unix seconds. The variable is assigned automatically.
- group: the group of module: Setup, Main or Teardown (Main by default). The user can specify the module group by using module_group marker.
- artifact: an object that contains information about the artifacts created during the test module. The user can specify the module artifact by using set_module_artifact function. The artifact contains a dictionary where the user can store any data at the test module level. The artifacts are not displayed on the operator panel.
- cases: an object that contains information about each test case within the module.
- test_{case_name}: an object containing information about a specific case.
The
{case_name}variable is assigned automatically. Contains the following fields: - status: test case execution status. The variable is assigned automatically.
- name: case name, by default the same as case_id. The user can specify the case name by using case_name marker.
- start_time: start time of case testing in Unix seconds. The variable is assigned automatically.
- stop_time: end time of case testing in Unix seconds. The variable is assigned automatically.
- assertion_msg: assert or error message if the test case fails. The variable is assigned automatically.
However, the user can write their own message in case of an assertion, which will be written to this variable.
For example:
The assertion_msg is displayed in the operator panel next to the test case in which it was called.
assert False, "This is an example" - msg: the log message is displayed in the operator panel next to the test case in which it was called. The user can specify and update current message by using set_message function.
- group: the group of case: Setup, Main or Teardown (Main by default). The user can specify the case group by using case_group marker.
- measurements: list of measurements. See the measurements section for more information.
- artifact: an object that contains information about the artifacts created during the test case. The user can specify the case artifact by using set_case_artifact function. The artifact contains a dictionary where the user can store any data at the test case level. The artifacts are not displayed on the operator panel.
- test_{case_name}: an object containing information about a specific case.
The
Measurements
The measurements section contains the information about measurements. The user fills in the list of measurements for each case by set_case_measurement function.
Numeric measurement
A NumericMeasurement is a structured container for storing numerical measurements. For example, the measured voltage must fall within a specific range.
- type:
numericby default. - value: numeric measure value.
- name: numeric measure name.
- unit: unit of numeric measure.
- operation: comparison operators of numeric measure.
- comparison_value value to compare against.
- lower_limit: lower limit for range operations.
- upper_limit upper limit for range operations.
- result the result of the measurement if the operation exists; otherwise, it is empty. Filled in without user involvement.
// voltage measure
{
  "type": "numeric",
  "value": "3.57",
  "name": "Main voltage",
  "lower_limit": "3.45",
  "upper_limit": "3.65",
  "unit": "V",
  "operation": "GTLT",
  "result": true
}
// temperature measure
{
  "type": "numeric",
  "value": "14",
}
String measurement
A StringMeasurement is a structured container for storing string measurements. For example, the firmware version comparison.
- type:
stringby default. - value: string measure value.
- name: string measure name.
- operation: comparison operators of string measure.
- comparison_value value to compare against.
- casesensitive: case sensitivity, default is
True. - result the result of the measurement if the operation exists; otherwise, it is empty. Filled in without user involvement.
{
  "type": "string",
  "value": "3.1.2",
  "operation": "EQ",
  "casesensitive": true,
  "result": true
}
Report example
Example of a document:
    {
      "_rev": "44867-3888ae85c19c428cc46685845953b483",
      "_id": "current",
      "stop_time": 1695817266,
      "start_time": 1695817263,
      "status": "failed",
      "name": "hardpy-stand",
      "user": null,
      "batch_serial_number": "0613",
      "caused_dut_failure": "test_1_a::test_minute_parity",
      "error_code": null,
      "dut": {
        "name": "analogue",
        "type": "PCBA",
        "serial_number": "92c5a4bb-ecb0-42c5-89ac-e0caca0919fd",
        "part_number": "0507",
        "revision": "rev_1",
        "sub_units": [],
        "info": {
          "sw_version": "3.2.0"
        }
      },
      "test_stand": {
        "hw_id": "840982098ca2459a7b22cc608eff65d4",
        "name": "test_stand_1",
        "revision": "1.0",
        "timezone": "Europe/Belgrade",
        "drivers": {},
        "location": "Belgrade_1",
        "number": 2,
        "instruments": [
          {
            "name": "Everypin Power Supply",
            "revision": "2.0",
            "serial_number": "1238",
            "part_number": "EPS_08",
            "number": 1,
            "comment": "",
            "info": {}
          }
        ],
        "info": {}
      },
      "process": {
        "name": "acceptance",
        "number": 1,
        "info": {}
      },
      "artifact": {},
      "modules": {
        "test_1_a": {
          "status": "failed",
          "name": "Module 1",
          "start_time": 1695816884,
          "stop_time": 1695817265,
          "group": "MAIN",
          "artifact": {},
          "cases": {
            "test_dut_info": {
              "status": "passed",
              "name": "DUT info",
              "start_time": 1695817263,
              "stop_time": 1695817264,
              "assertion_msg": null,
              "measurements": [],
              "msg": null,
              "group": "MAIN",
              "artifact": {}
            },
            "test_minute_parity": {
              "status": "failed",
              "name": "Test 1",
              "start_time": 1695817264,
              "stop_time": 1695817264,
              "assertion_msg": "The test failed because minute 21 is odd! Try again!",
              "measurements": [],
              "msg": [
                "Current minute 21"
              ],
              "group": "MAIN",
              "artifact": {
                "data_str": "123DATA",
                "data_int": 12345,
                "data_dict": {
                  "test_key": "456DATA"
                }
              }
            }
          }
        }
      }
    }
CouchDB instance
This section explains how to launch and manage a CouchDB instance. After launching the database, it becomes available at the following address:
The internal settings of the database are contained in the couchDB.ini configuration file. It contains settings that define the behavior and operating parameters of the database.
Running CouchDB with Docker Compose
An example configuration for running CouchDB via Docker Compose is located in
the example/database/couchdb folder.
A shortened version of the instructions is described below.
- Create a
dockerdirectory in the project's root directory. - Create a
couchdb.inifile in thedockerdirectory.
[chttpd]
enable_cors=true

[cors]
origins = *
methods = GET, PUT, POST, HEAD, DELETE
credentials = true
headers = accept, authorization, content-type, origin, referer, x-csrf-token
docker-compose.yaml file in project's root directory.
services:
  couchserver:
    image: couchdb:3.4
    ports:
      - "5984:5984"
    environment:
      COUCHDB_USER: dev
      COUCHDB_PASSWORD: dev
    volumes:
      - couchdb_data:/opt/couchdb/data
      - ./database/couchdb.ini:/opt/couchdb/etc/local.ini

volumes:
  couchdb_data:
docker compose up
docker compose down
Running CouchDB with Docker
- Create
couchdb.inifile.
[chttpd]
enable_cors=true

[cors]
origins = *
methods = GET, PUT, POST, HEAD, DELETE
credentials = true
headers = accept, authorization, content-type, origin, referer, x-csrf-token
docker run --rm --name couchdb -p 5984:5984 -e COUCHDB_USER=dev -e COUCHDB_PASSWORD=dev -v ./couchdb.ini:/opt/couchdb/etc/local.ini couchdb:3.4
Command for Windows:
docker run --rm --name couchdb -p 5984:5984 -e COUCHDB_USER=dev -e COUCHDB_PASSWORD=dev -v .\couchdb.ini:/opt/couchdb/etc/local.ini couchdb:3.4
The container will be deleted after use.
Running CouchDB with binary packages in Linux
- Use this instruction to install CouchDB.
- The installer asks you if you want to install CouchDB as a standalone
application or in a clustered configuration.
Select
Standaloneand press Enter. - You are prompted to enter the Erlang Node Name.
You can ask it in Terminal with the command
hostname -f. - Set the Erlang Magic Cookie.
This is a unique identifier, for example,
test1234. - Configure the network interfaces on which CouchDB will be bound
localhostis fine. - Enter an admin password of your choice for CouchDB, press
Enter, re-type the password and pressEnteragain to continue the installation. - After launching the database, it becomes available at the following address http://localhost:5984/_utils/. Open it.
- First of all, in the
User Managementsection in theCreate Adminstab, create a user with the logindevand passworddev. - In the
ConfigchooseCORSand appointEnable CORSwithAll domains.
To disable the CouchDB service:
Remove packages:
sudo apt remove --purge couchdb
sudo rm /usr/share/keyrings/couchdb-archive-keyring.gpg
sudo rm /etc/apt/sources.list.d/couchdb.list
sudo apt clean
systemctl stop couchdb.service
systemctl disable couchdb.service
systemctl daemon-reload
systemctl reset-failed
Running CouchDB with binary packages in Windows
- Use this instruction to install CouchDB.
- Be sure to install CouchDB to a path with no spaces, such as
C:\CouchDB. - Create a user with the login
devand passworddevduring the installation steps. Validate Credentials. - Generate Random Cookie.
- After launching the database, it becomes available at the following address http://localhost:5984/_utils/. Open it.
- In the
ConfigchooseCORSand appointEnable CORSwithAll domains.